If we have a planned progression for the next three weeks, they may not even notice the extra domestic workload...what are my chances? Wish me luck! ;)
Bye now,
Di
,
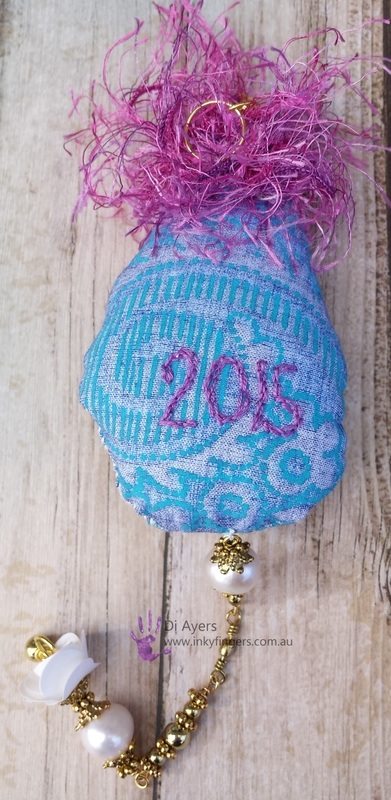
I had to make a couple more...this time I cut the bodies as a Christmas tree triangle shape and stitched them with the machine which much speedier and gives a more robust result...depends if you just want to sit and hand sew, which is a very relaxing thing to do, or just want to get onto the making of these little beauties, as I did. Sybilla is just a little hoity toity and seems to take her station in life a little too seriously...but who could blame her? Feathers feature, one never knows after all, when a vice-regal occasion may loom over the horizon. She has Swarovski crystal buttons and circlet on her head to support those regal feathers. Her tail feather sparkles with her entire diamond collection and a circle of purple and blue lash yarn and tiny seed beads circle her face, appropriately drawing attention to her beauty,,,
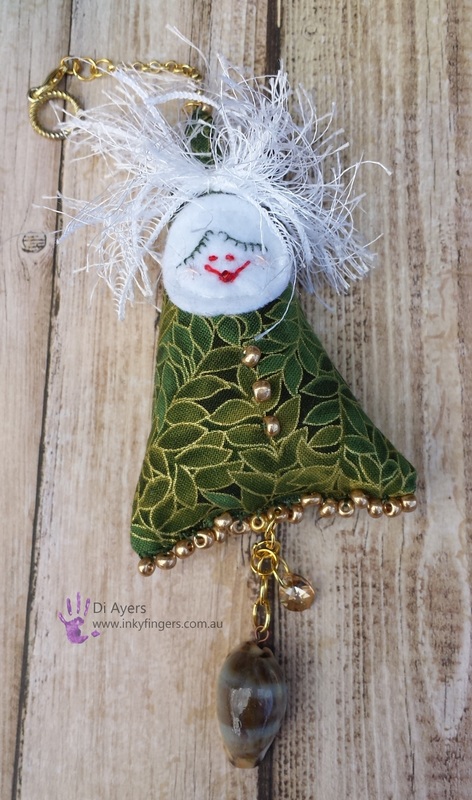
 That's about it, I think I am done with these little ladies for the time being...after all, tomorrow starts the count down to Christmas...I have a planner to develop today, the lads need clear and unambiguous direction if we are to get the house all spruced up, (strange saying, we don't use spruce here, as decoration...), silver cleaning, decorations, gardening, external cobweb removal, et al.
If we have a planned progression for the next three weeks, they may not even notice the extra domestic workload...what are my chances? Wish me luck! ;) Bye now, Di
0 Comments
I saw, out there in blogland, a mention of a little naive looking doll, called a Dotee. Apparently named by/for their maker, Dorothy Christian, from Victoria, who has since removed her videos and shut down her blog except to those she invites, so I can't get any information about them from that source. There are a few blogs with mentions, particularly this one...A Cloth Doll Makers Diary...a blog set up to house links to sites and tutorials for anyone with an interest in cloth dolls. Very well worth a look-see if you are interested, I had a brief squizz and found links to some lovely free embroidery patterns... From the little I have read, they appear to be like ATC's for doll makers...made to be given to specific people as a token of friendship, consolation, joy...whatever is required. They are never made to be sold. A sweet idea. I had to have a go last evening, and I can see that they could become quite addictive, especially as they take so little time to make, can showcase your amazing embroidery, beading and other hand sewing skills and could utilise any of those hard to discard beautiful fabric and lace scraps that really aren't large enough to use for other purposes. They would be perfect to make with a granddaughter, if one had one, or a borrowed child who likes dolls and making things. I made Agnes, (her name, don't ask me why...she just came with that moniker...), in a couple of hours...things I learned en route include... I will make a body pattern next time... I will probably sew the body together on my machine... I won't use old bits of crochet, just to use them up... I'd like to make another... I really want to dig out my old laces and some nice fabric. Agnes is a tad too naive for my taste...although, as she is destined for Sarah and Karina's Christmas tree (whether they like it or not...Agnes has attitude!), I did give her a rather splendid gold tail and some gold beading to make her a bit festive. Also, I have a goodly little collection of gold coloured jewellery finding which I simply never use. It was great to have a little project to utilise some of them and gave me a good reason for tidying up my jewellery making box. Here she is... A couple of young fledgling starlings have taken it upon themselves to sit on some pots of succulents I have growing along the base of a mirror attached to our garden fence. They sit there day after day, admiring themselves in the mirror, squawking for a parent to fly in a picnic basket, and (the little delinquents), pruning the succulents. I have had to remove the pots to a safe place until the birdlings are able to take themselves off to broader horizons, before they completely denude the little plants. The plants were all doing extremely well before they started their gardening activities. There are plenty of weeds they could be working on, after all. Better trot, things to do. Someone seems to have made a bit of a mess in my craft room...
Bye now, Di It is done! The puds are made, and before the end of November too. The past two or three days have been shopping at Eumarrah for the fruits and nuts required, measuring, mixing (Chris' job), and getting everything, well almost as I forgot to ensure the "old currency" coins, (threepences, sixpences and shillings, I think that the two shilling piece was pocketed a year or two back by some unethical recipient...I shouldn't have said that! It may have been a child and children are entitled to keep whatever they find). Now I have to wait for the lads to come home to get down the Christmas box from the top storage shelf in order to hunt them out and boil them ready to be pushed down into the uncooked pudding. The stove top is full anyway just now so the last three puddings, including the largest one which we will eat on Christmas day and is the one to receive the coins, are sitting waiting for some space to be available. They will all be cooked by this evening though, yay. They do smell delicious, as they cook... I am not sure where this recipe came from..To my mind it is obviously English as Barley wine is one of the ingredients. I found it, many years ago, amongst my mothers very eclectic mix of cuttings and hand written recipes when writing them up for her. Dad and I had decided we needed to get her recipe drawer tidied up when she was away, visiting my sister and b-i-l in New Zealand who were expecting their first child. I am not sure if she was too thrilled about it, she probably could never find the recipe she needed ever again. Anyhow, I copied out this recipe and when I asked her about who had given it to her she could not remember and dismissed it as she had her own recipe that she preferred to use. I tucked it away, and many years later when I started cooking my own Christmas dinners, I found it and gave it a try. I love it and used it ever since, with just a few adjustments. Mum and dad loved it too, so much so that she adopted it for her puddings each year, and one of my s-i-l's did too. It has become a family favourite. Mind you, I have never made barley wine, and use milk as a substitute. This recipe uses suet as the shortening agent but as Sarah will be eating with us at Christmas, I have replaced the suet with butter as she does not eat animal products, she is a bit selective, but butter in cakes and puddings is OK with her. Using butter instead of suet does not produce as rich a pudding, but her company more than makes up for that. A few years back in late March, I was staying at a youth hostel on Bruny Island with some work colleagues. I had taken one of my puds (from the freezer) to share with the others as part of one of our shared meals over the weekend.
Staying there at the same time was a young German lad who had been sent off by his parents for twelve months to travel the world, before returning home to undertake compulsory national service. Something I believe occurs on leaving school and before commencing university. He explained that they had thought him too young to undergo that sort of rigorous training...it went through my mind as he was telling the tale that they hadn't thought him too young to undertake a very grand world tour completely unaccompanied at what seemed to me a very tender age, but I am sure they knew their son best. He was a delightful and very personable young man who had improved his language skills enormously (he told us) during the twelve months, and I am sure his life skills had developed at the same pace, (I had a son the same age and had some inkling). He was about to return home after this last few days in Tasmania and was very pleased to share our meals for the couple of days we shared the accommodation, as he had rather underestimated the availability of food sources on the island for someone without either vehicular transport, or fishing equipment. The Christmas pudding really surprised him...he said he had never eaten anything like it and he really tucked in. I had forgotten that this pud had also had coins included (my children were still young enough to expect them at every spoonful), and his surprise and delight were unbounded. I have to say that we did not actually get a chance of a second helping...he polished it all off and went off home with a goodly collection of "old" Australian coins in his pocket, and I'm sure with a tale of the strange eating habits of Tasmanians... Better go and check the water levels, can't leave these little babies unattended for too long... Bye now, Di I finally put together a little notebook for my personal use. It is the last of the stiff covers I made a while back when I had run out of Multi Matte Medium and used other glues to cover the cereal box covers I was preparing. As a result, they all became too stiff and unwieldy for my taste, and they almost joined the veggie scraps in the compost bin...but I decided I may be able to use them, after all. The other one I turned into a small diary for a great niece, and this is the last, at 10.2 cm x 14.8 cm, (4 x 53/4") with a 2.5 cm (1") spine, it is the perfect size for tossing in my bag, for notes, shopping lists etc. As I used sewing pattern tissue in layers on this cover, I continued the theme with the simple low profile embellishments and used older TH sewing themed papers as signature covers. Even the closure is in keeping... I have put pockets inside the front and back covers only, using the same TH paper off cuts. The four fat signatures are made up of old parchment from my paper box, and lined exercise book pages. The closure for this one, as it will be living in my bag and I don't want it catching on anything, or coming open, is a fine elastic band pushed through a couple of holes in the back and tied in a knot. The knot is low profile enough not to be a nuisance, and the closure sits between the edges of the pages and the cover very neatly.
...at Retro Rubber this challenge, (Number 28), so I decided to haul out an old Hero Arts stamp called "A Village"...I like to bring this one out every now and then and challenge myself to make use of it in a new way than previously. I have used it for many occasions, but never in the design of a Christmas card, until now. It wasn't easy...I knew in my head just how I wanted it to look, but given I had no amazingly teeny tiny light garlands, or other cunning devices, I really did have some trouble getting the look I wanted. Sometimes we just have to accept second best, and live with it. Here is the card I made first (and put right in the bin it was so horrid). The final card...one has to draw the line and stop wasting time and resources when the idea is simply not working...I started off with the thought that I would use the same sentiment, Deck the Halls, but as it progressed, with it's sombre colouring, I decided to use it instead for someone living overseas. In this unquiet time, especially in Europe, our thoughts inevitably turn to having loved ones near...even if that is not always possible. So here is numero due... For this version I cut away some of the top rows of houses to give me a skyline. I then DI'd up a panel in blues for a night sky. I was going to stamp or stencil stars in place but when I used my PTI Star Banner die to make the stencil I realised the little stars cut from the paper would be perfect to adhere to the card instead. I made a mask for each of the three decorated houses and used Black Soot DI to grey up the whole panel to make it look more like a night scene. I removed the masks and then decorated up the 3 houses using a yellow marker, Staedler metallic gel liners and a Sakura Gelly Roll Clear Star pan. I cut out a teeny Christmas tree and found a minute yellow star to glue to the top. A SSS banner and stamp completed the front panel and then I adhered the lot to a red card base, using a low profile ds tape to give the house section a little dimension without compromising the postal costs. I am still not really happy with the outcome, but can live with this card, and I have now used this stamp in a Christmas card...don't think I will get it out again for a while now...I am a tad over it for the time being.
Bye now, Di CAS(E) this sketch challenge is number 150...so how could I not participate! Besides, I needed a card for my dear DIL and had the stamp set and laminator all fired up to go. She loves blue, and silver, so the card almost made itself! I videoed the process, watch it here... or on You Tube... I used a SU ink, Pacific Point to stamp the final layer for the sentiment, quickly coating it with fine clear embossing powder and heat setting it to give it a little shine and to accentuate the colour a tad. The "birthday" word was stamped directly on the card front and a plain dark blue scrap was used as a mat onto the Bazzill Marshmallow card base. The butterflies were stamped with Versamark ink direct onto the card front and white heat embossed before being covered with silver foil and run through my laminator. A final tizzying up with three pale blue sprinkles onto the card around the sentiment and a tiny silver sprinkle being adhered to the head of each of the butterflies and the card is done. I hope she likes it. I have also revamped "Le Petit Journal" and will send this to her with the card. She journals quite a lot so I hope she gets some use out of it. Nothing but the cover remains from the original journal. I had been experimenting at the time with different glues, to my cost. But, one lives and learns...if all cheap adhesives were as good as the dear adhesives, there would be no dear adhesives, nes pas? (or more probably there would be no cheap adhesives...) I even removed the seam binding closure and replaced it with a more workaday hair elastic, same blue but more practical. I find the seam binding loses it's looks way too fast for comfort. If I attach it while I am making the journal, it needs replacing before I give it away...but it does look pretty. I think I may have to work out how I can combine the two, a hair band and a seam binding bow...that way it would be meerly decorative and would not get damaged by the usual wear and tear. A also added a little (detatchable) dangly bit in my usual style, with fishing swivels, jump rings etc. One is a small colourful resin dragonfly, 1 is a TH heart locket with "us" as the text and the third is 3 blue glass beads (one of each of the sprouts) with a Swarovski crystal star on the end. I am a sentimentalist, after all. The little Triple Corner Pocket construction shown above on the back of the last page was made some time ago from a great tutorial by Papercrafter45, that I made for another project and ended up not using.. As the main panel of this little pocket is a lovely deep blue, with gold stars, it has finally found a permanent home!
Tim has finally heard back regarding his sleep apnoea test results. (I have a photo of him all wired up for the night, but I am totally forbidden, on pain of death, to post it! Men are so vain). He has an appointment tomorrow morning. It will be interesting to find out what next in this process...I am just amazed we are at this point...it has taken me so many weary, sleepless nights/years to get him to begin to take some steps in his own health care in this regard... Well, that's it from me, bye for now, Di The challenge colours at CAS Colours and Sketches this week are not colours I ever use, not together anyway...so why not? One only lives once, after all. I can now say that I have made a card I can live with using Watermelon Wonder pink and Lost Lagoon green, plus silver! As usual, I don't have those specific SU colours, so I substituted a PTI ink, Ocean Tides, for the green and my newly acquired DI Abandoned Coral, as being my closest matches. When I was rootling through my PTI cardstock, (occasionally in the past I have purchased their cardstock sampler packs, great value but I seem to have several sheets of a watermelony colour card sitting disconsolately in my "American Size" cardstock bin. Obviously I don't like/use that colour at all, because almost every other sheet from those packs has long since vanished. I think, looking at the PTI colour swatch page, that it is probably Berry Sorbet, but whatever it is it matched the DI coral colour almost perfectly, so it has been renamed, for the purposes of this challenge, as "I wonder if it is Watermelon enough"...Ocean Tides, to my eye, seems close enough to escape comment, and as for the silver, well, I just heat embossed the main sentiment and the flower centres in white embossing powder and silver foiled them, to great effect...I love using this stuff! I have never had a bad foiling experience...my only wish is that I could lash out and buy some other colours, but, austerity and restraint is all, and I was brought up to understand that silver is like good manners...reliable in any situation! Enough! To the card! I used a couple of PTI stamp sets on this card, the flowers, leaves and "birthday" are from Embroidered Blooms and the "happy" stamp is from the Pretty Peony stamp set, one of my most used PTI sets. It has a floral pattern on the word and I really thought that this would not show once the word was heat embossed and then run through my laminator to foil it. I was really happy with how it looks though...the pattern in these photographs may look rather as if the silver is crazed, but in reality it has all the whorls and line designs of the original stamp, just a little thickened. It works really well.
I am getting to like that colour a little better, in fact now that I have cut into the sheet of cardstock I will have to use it up. I have a couple of birthdays coming up and I think I will explore these colours just a little further... Better go, dishwasher to load, I wanted to get the photographs taken before the light faded...I did think the kitchen fairies might call past while I was on the computer, but if they did come they have been very very quiet about it... Bye now, Di The November SBB Cupcake Challenge image was quite unambiguous in it's statement...composed of red, green, holly and candles...so it didn't take me too long to decide to make an Easter Card...ha ha ...only kidding! I also decided to add this card to the Addicted to CAS 3rd. Birthday, Challenge #77, DIMENSION blog...not sure (once again), if this is CAS enough, but someone will tell me if it's not, I am sure... I decided to go with the traditional Christmas theme, and, as my head was still full of my previous card with the dimensional insert frame, I decided I might just as well get it out of my system and make another. I find that I do get a bit focused on whatever has caught my eye recently and until I have made one or two, ironed out any bugs and know just how things work, I tend to keep at it until either I give up or I have it down pat. Not just with making a card, either. I decided to video the process, so here it is, watch here or on You Tube. As described in the video, the finished card is measures 4.5 x 4.25 inches, with a 1/2 inch spine. I coloured the back panel originally only with Squeezed Lemonade DI, but after some thought I added Tumbled Glass, Chipped Sapphire and Faded Jeans to darken the background and give some illusion of light from the flames. I think it looks better with the blue. I cut out a couple of border holly leaf edges with my MS punch, plus a couple of the matching corner punch pieces in two different shades of green card. I DI'd the edges gently with Forest Moss DI and coated them in GA, for shine. Three red candles and some orange red and yellow card "flames" were assembled and also coated with GA. These were fairly thick coats so while they dried I assembled the rest of the card base, using my favourite Bazzill marshmallow card stock. This card base measured nine inches by four and a half, and was scored at four and a quarter and four and three quarter inches, to form the spine. Here is the card front, you can see the DI'd background, the candles and the glossed up holly leaves...I added some Xmas Red Stickles (their name, not mine!!), among the holly leaves. A small "Peace" sentiment was added as an afterthought, I really should have added it before completing the card, but I wasn't really sure I wanted a sentiment on the front. Well, that's about it from me, see you soon, I think I am just about challenged out!
Do you think I am just putting off making those Christmas puddings? Bye now, Di |
AuthorHello, I'm Di...I live in beautiful Tasmania, I enjoy making cards and journals for special folk. Categories
All
Archives
December 2019
|